Two Ingredient Play Dough


If you’re looking for a fun way to keep your children occupied for a few hours, this two ingredient play dough is a cheap and simple craft that is perfect for young children.

I say it is two ingredients because the play dough itself is made of only corn starch and cheap hair conditioner. You can easily buy these at your local dollar store, which makes it an even more attractive prospect for the mom on a budget.

However, if you are feeling like you want to go the extra mile, you can add food coloring and/or glitter to your homemade play dough in order to make it a bit special. My kids usually want the colors, so I go ahead and add them in. But be assured, they will have just as much fun without them.

And, if we’re being honest, within a few minutes, they end up squishing all the colors into one giant mass anyway.

Making this DIY play dough couldn’t be simpler, but I will let you know that it can be slightly fiddly depending on the weather where you are. If its a little dry, you may need a tiny bit of extra conditioner. A bit humid? Sprinkle on some extra corn starch.


I’ll also warn you that this stuff is STICKY. Especially at the beginning. It will stick to anything and everything, so you may want to get a plastic tablecloth or disposable cover for your table.


You’re going to have to pour it out onto your work surface so you can use your hands to really get in there to thoroughly mix it. I suggest spreading a LOT of corn starch onto the counter before you put down your dough, because as I mentioned before – it is STICKY.


The more you knead your “dough,” the more it will firm up and become less sticky. Just understand that if you have very young kids, you’ll want to wait to give it to them until you’ve thoroughly mixed it. Older kids can help out.

Keep adding in lots of corn starch whenever you feel like you need it. You pretty much can’t go wrong here. Just keep adding it as long as it keep sticking to you.
Once you feel like it’s finally holding together and not a giant sticky nightmare, you can either give it to your kids or add in your colors. I like to divide it into bowls to add the colors, so I cut it into equal sized chunks depending on how many colors I want.


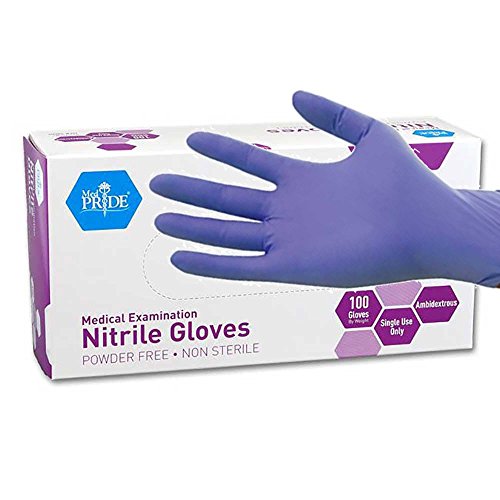
Also? If you are planning on using food coloring, be sure to get some disposable gloves or you’ll end up dying your skin. I speak from experience.

Here’s the thing about coloring your dough. You can’t just stir the colors in. This is an intensive process. It takes about five minutes per color to really get them mixed. My six colors took me half an hour! Yikes!
But if you don’t thoroughly mix the colors in advance, they WILL stain everything they touch. That includes your children, your table, your clothes, your floors, your carpet, your dog, and your curtains.
My point is that if you are going to do the color thing? Do it right.

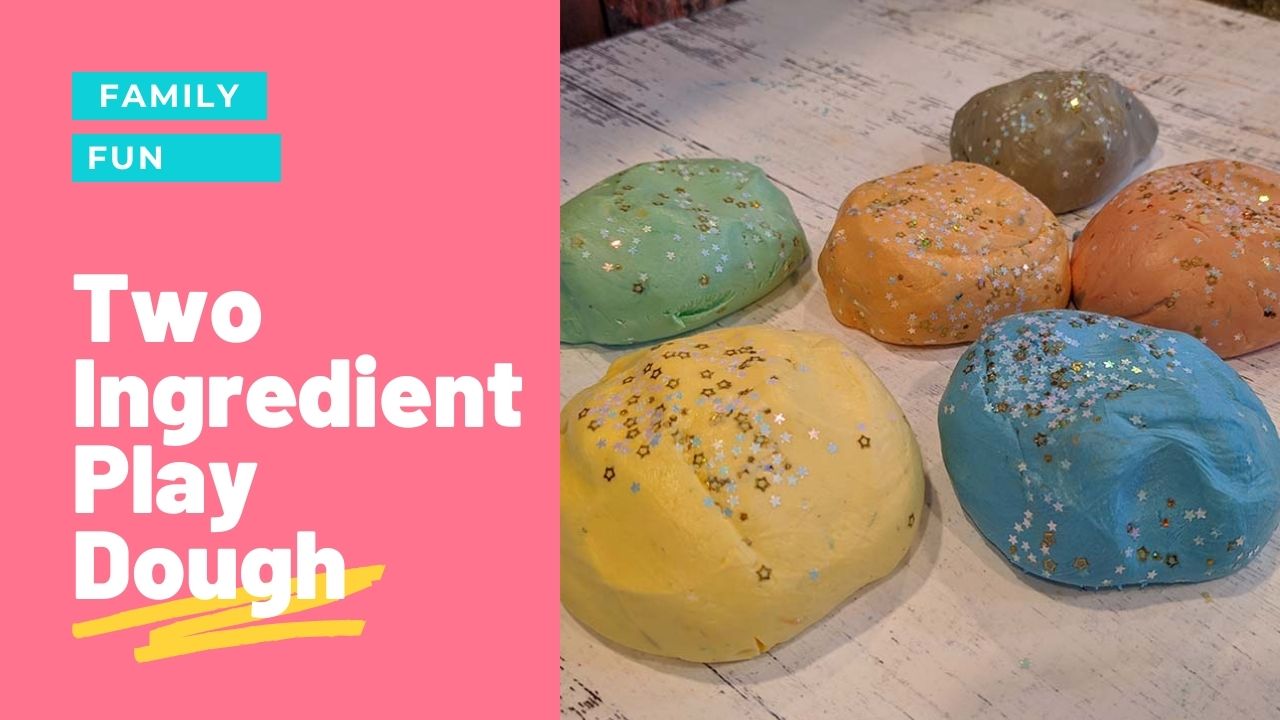
And there you are! Six colors of play dough, all homemade. Yes, I know that the dollar store sells tubs of Play Doh for $1 each. But mine makes a TON more, and it only cost $2. I mean, really I already had all the ingredients on hand, so it was pretty much free. Just a labor of love.
Anyway, because I’m a glutton for punishment, and I do love a good messy play activity, I decided to make this even more messy by adding in a good heaping helping of glitter! Because why not!?


I have four boys. I don’t get a lot of glitter in my life. Let me have my fun.
And that pretty much sums it up. Ain’t it purdy??


And the proof is in the pudding. My kiddos LOVED it. They played with it for hours on end. They played together without fighting.


Funnily enough, I first shared this recipe on this blog several years ago back when I only had two baby boys, and they loved it just as much then as they do now.
Its so fun to look back on these pictures from six years ago and see how much my older two boys have grown between then and now!


Suffice it to say, whether you are preparing for an epic play date, or you just want to have some fun with your kiddos, this is an excellent craft that you can do with the kids and know they’ll have fun.
A couple of other things to mention – if you don’t have conditioner on hand, you can also use cheap lotion. Either way, the bonus of preparing this homemade play dough is that you get super soft hands for the rest of the day. Score!
To clean up any messes here, my suggestion is just to use a wet paper towel on any hard surfaces as soon as you see it. But if you miss anything, it dries hard and turns into a soft powder, so it’s pretty easy to sweep or vacuum, so there’s not much worry about long term issues.
I would not, however, let them near your fancy couch with it. I can’t vouch for what brand conditioner you bought, and I won’t offer to pay your cleaning bill.
Also, as long as you’re making DIY play dough, you may also want to try your hand at my “Magic Snow” craft, as it is a similar type of activity, except it is MUCH quicker, and it is way less messy and easier to clean up.

Homemade Play Dough
If you're looking for a fun way to keep your children occupied for a few hours, this two ingredient play dough is a cheap and simple craft that is perfect for young children.
Materials
- 2 C corn starch
- 1 C hair conditioner or lotion
- food dye (optional)
- glitter (optional)
Tools
- large plastic bowl
- spoon
- measuring cups
- measuring spoons
- disposable gloves
- plastic sheet
Instructions
- Lay out your plastic sheet to protect your work surfaces, as this project can get messy.
- Gloves may be worn for the entire project if desired, but they are especially needed if food coloring is to be used.
- Into a large bowl, measure out 2 cups of corn starch
- Add 1 cup of cheap hair conditioner or lotion into your corn starch
- Use a spoon to stir together your mixture until well combined. It should look thick and glossy.
- Place extra corn starch onto your work surface and then pour your mixture onto it.
- Knead the mixture well, adding more corn starch as you go so that it becomes a very thick and pliable dough. It should hold its shape well, but when held up, gravity should be able to pull it down in one long string without breaking.
- Play dough is ready at this stage and can be used as is.
- If color is desired, cut into equal sized portions and place into bowls.
- Add in several drops of food coloring until desired color intensity is reached.
- Take each bowl of dough with coloring in turn and knead well until color is evenly dispersed and desired effect is achieved.
- If desired, add glitter to each portion of dough and knead thoroughly once again.
- Homemade play dough is now ready to be enjoyed.
Notes
To store play dough, place individual colors into air tight containers such as Tupperware bowls with lids or sealed plastic bags with air removed. If you notice the dough is getting dried out, a small amount of conditioner may be added in and kneaded through to re-hydrate it.
Recommended Products
As an Amazon Associate and member of other affiliate programs, I earn from qualifying purchases.


Katie Reed is a passionate writer and mother of four vivacious boys from Salt Lake City, Utah. Drawing from her own journey through TTC, pregnancy, and the joys of raising children, she offers a wealth of insight into the world of motherhood. Beyond her heartfelt tales, Katie delights her readers with family-friendly recipes, engaging crafts, and a curated library of printables for both kids and adults. When she’s not penning her experiences, you’ll find her crafting memories with her husband and sons—Dexter, Daniel, Chester, and Wilder.


This looks so easy! Thanks for sharing!
So easy! Love it! Thank you for sharing at the #homematters linky party this week. I hope you will be back this week to share again! Rhonda
So easy and fast! Thanks for sharing at the #HomeMattersParty
This is so easy to make that it’s easier than going to the store to buy playdough. Thanks for sharing at the This Is How We Roll Link Party on Organized 31.
So easy so simple but so much for for our kids! thank you for linking up with the #pinitparty
Its a great playdough- leaves hands soft. But we found it didnt keep well after being played with all day by 30 some odd kids (lol)