Amazing $5 Table ReVamp Using Mod Podge and Wrapping Paper
I LOVE home projects that are super cheap but pack a HUGE punch. This $5 Table ReVamp fits the bill perfectly. Using only some chalk paint, Mod Podge and wrapping paper, I transformed a rather mundane wooden table into a work of art!

I found this super cute little table at our local DI (that’s Deseret Industries, a church-run thrift store chain found here in Utah) for $5 last summer. It has been used in various places in my home, and it’s looks good pretty much anywhere. We’ve used it as a kid’s dining table, a craft table, a coffee table and even a bench! The wings fold down so that you can have it as a circular table or more rectangular.


It really needed to be refinished, as there were lots of scratches and stains on it. But since there’s a lot of wood in our house already, I wanted something a little bolder and more fun. I originally intended to just use chalk paint and distress it, but that still didn’t seem like it would be enough. But I was stumped on what to do. I decided to just paint it white and see what ideas I could come up with.
I started with the underside, turning it upside down and painting underneath. I didn’t bother with the middle, as I knew it would never be seen, but I made sure to do the wings.

I used some white chalk paint that I found at Walmart, but I would not use it again. It was super thick and didn’t spread well at ALL. It also lacked coverage. I didn’t mind too much, though, as I knew I wasn’t going for an all white look. I figured whatever white showed through at the end, I could just distress it a bit and make it look intentional.

Once the underside and legs were dry to the touch (about an hour), I turned it over and painted the rest. I then left the whole thing for about four hours until it was completely dry.
Once I saw it full white, I knew immediately what I wanted to do. I had found several rolls of black and white wrapping paper in various patterns at Michaels for $1 each. I had polkadots, chevrons, and even Moroccan print. I decided that the polkadots would be easiest to match up, so I grabbed my roll and my tub of mod podge and went to work.
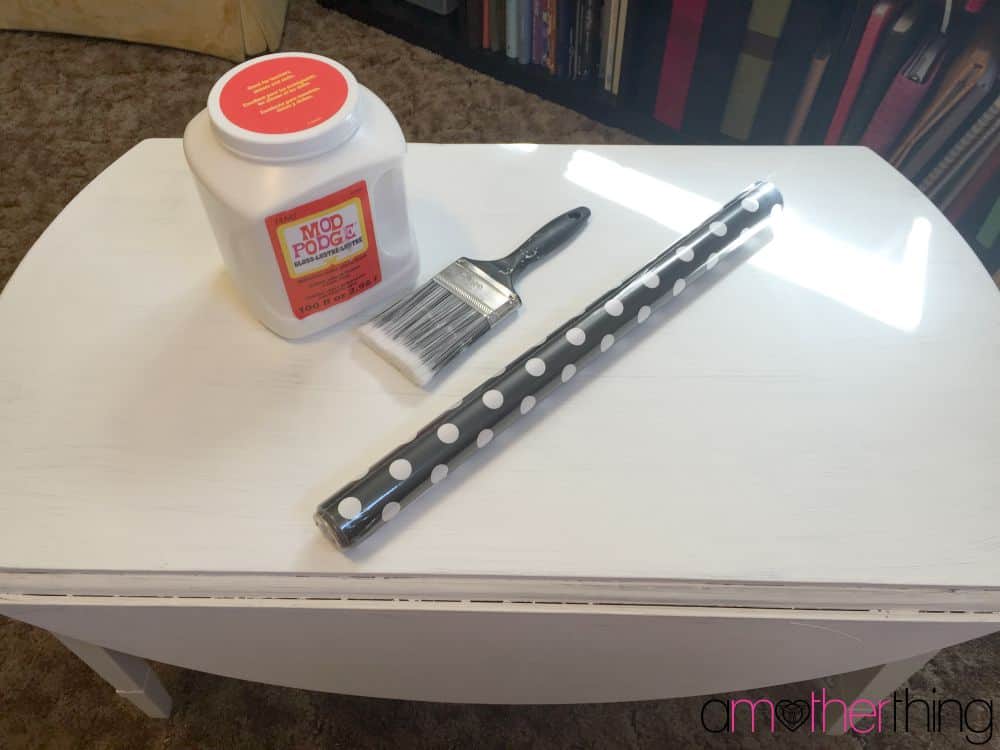
I folded down the sides and focussed on the top of the table first. Since my roll of wrapping paper was exactly the same width as the table, I just laid it lengthwise across the top until I had a piece big enough to cover the whole thing. Since the ends were rounded, I knew I’d have to trim it, so I made sure there was enough overhang to reach every spot.
I then used my brush to give the top of the table a nice layer of Mod Podge. I put it on somewhat thickly because the wrapping paper was very thin, and I wanted to get good adhesion the first time. I knew if I had to pull it up to redo it, the paper would rip.

One of the big problems that I had is that the paper (being so thin) wrinkled spectacularly right away. And as I used scissors to cut the edges, I found that the wet paper kind of tore a bit making it look a little jagged. I didn’t mind too much, as I like when things look a little distressed, but if you are fussy about these things, you’ll want to be very careful. It may have been smarter to let it all dry before cutting the excess.

Once everything was trimmed and smoothed out the best I could get it, I added another layer of Mod Podge right on top. I made sure to go over the edges so that the ends would stay down and not curl over time. I then let it dry for about an hour before moving on to the wings.

I followed the same steps for the wings of the table as I had for the top. I laid down my layer of Mod Podge, and then I laid my paper on top. But this time I had to take extra care to line up the paper correctly so that the polkadots would be seamless. It wasn’t very difficult (one of the reasons I chose the polkadots!), but as mentioned before the paper tears easily, so preparation is key!
I did both sides of the table, making sure to finish with a layer of Mod Podge. I left it to dry for about four hours and then added one last layer of Mod Podge to the top of the whole table.

Finally, I left the whole thing to dry for about 24 hours to ensure it would not be sticky or gammy in any way.
When I was satisfied that it was dry, I took some black chalk paint, and I went around the outer edge of the table, where the paper looked jagged. Unfortunately I no longer liked the “distressed” look and thought it was quite sloppy. The black paint made it look a lot more polished.
I also used the paint on the legs where there was a tiny little detail around them. It broke up all the white quite nicely.

In the end, I loved how it turned out. I learned a lot from this experience that I can take with me into my next project.

It looks really great, whether the wings are up or down, and it really jazzes up the space. It is super cute and whimsical, which makes me so happy!


I think if I had to do it again, I’d be a little more careful with the painting of the edges, using a smaller brush and some painter’s tape to make sure the lines are crisp. But I still think it looks wonderful as is, and since I had everything on hand, it was such a cheap project to do!
What do you think? Isn’t it an amazing transformation!? I can’t wait until I can pull up the ugly carpet and paint the walls and make the rest of the room as cute as this table!

Katie Reed is a passionate writer and mother of four vivacious boys from Salt Lake City, Utah. Drawing from her own journey through TTC, pregnancy, and the joys of raising children, she offers a wealth of insight into the world of motherhood. Beyond her heartfelt tales, Katie delights her readers with family-friendly recipes, engaging crafts, and a curated library of printables for both kids and adults. When she’s not penning her experiences, you’ll find her crafting memories with her husband and sons—Dexter, Daniel, Chester, and Wilder.


Well it’s been years since you posted this, so I hope you got a new carpet( haha) I was going to suggest doing crafts upon it. (Oops! A spill!) love the polka dots! Amazing transformation! Great job!
That is adorable! I love seeing old things get a new life. 🙂 Glad I found this at the #HomeMattersParty
Love the polka dots.Amazing transformation. Thank you for sharing with us at #HomeMattersParty. We would love to have you again next week.
The table is so cute. I love the polka dots.
Your table looks FAB! Great job! Thanks so much for sharing your crafty inspiration on this week’s Monday Funday Party! XO
I never would have thought to do this! I love the result. Thanks for sharing on the #HomeMattersParty . I hope you will join us again next week.
I love what you have done here it looks amazing! I use wallpaper to revamp furniture which is a bit easy to use than wrapping paper as it doesn’t wrinkle and can be manouvered
VERY cute! Love the b/w dot choice!
Perspective
I had no idea Mod podge could do this also!
And I learned about mod podge from a woman at our church who loves art. Super cool!
This is a fantastic outcome!
Omg!!! I seriously need to try this with a yucky table we have in my hubby’s man cave! This is seriously the coolest idea ever!!!
These are the kind of projects I love doing. It is nice to turn something plain into something beautiful. I have a couple of tables I can do this to for sure. Thanks so much for sharing. It looks gorgeous.
Look how pretty it turned out to be! You did a very good job at revamping the plain looking table.
Well look at that, that’s a complete transformation. I love it, it came out great!
You did a great job!!! I love the pattern you picked and the detailed black stripe on the legs. I haven’t had much experience with Modge Podge but maybe I should start!
What an awesome transformation! I’m always afraid of projects like this, but you make it look easy!!
The polka dot makeover is really well done. It gives the area a newer and more refreshing look.
I love the transformation. Its beautiful and it looks easy to do. I would love to try this.
It looks so cool like this, especially in that room! Polka dots are definitely in right now!
Oh my gosh you make this look so easy! I love your end result I never would have guess that was wrapping paper on the table!
This is definitely a DIY success! It looks fabulous – very nicely done! Feel free to stop by my place and perform a similar transformation!
This is beautifully done, well done I am so in love with it.
That looks so great! I wouldn’t have ever thought to use wrapping paper to revamp a table like that.
You did an amazing job! I’ve always wanted to refinish furniture, but apparently all the furniture we have is too cheap or not made out of the right kind of wood to refurnish according to my husband. That is a really cute table, its neat the sides fold down!
I would never have thought to do that with a table-what a great idea. I probably would not have chosen polka dots and might have gone with a nature print of some kind-but it does blend into your home perfectly.
I love when old furniture can look like new! What a remarkable change and really changes the whole way the room is too!
Woaaa what a transformation! I absolutely love the polkadots and how cute it looks 😀
I LOVE how the table turned out (love the polka dots!) It’s crazy what a little Mod Podge and Wrapping Paper can do. DIY projects are the BEST <3