Elf of the Shelf Christmas Table
Elves are always watching! They see when children misbehave and when they’re extra nice. What better way to reward a child for their good deeds than with a visit from the Elf on the Shelf?
Today, I thought I’d share with you this AMAZING Elf on the Shelf Table Idea. SAY WHAT?! Yep, you heard me! If you’ve been keeping up with that darn Elf every day, my hats off to you. This was our first year participating in the tradition, and my kids have had a blast. We have NOT put stress on ourselves to set up intricate situations. We simply move him from one place to the next every day, and that is enough.
But for the big day, we’ve been planning on having Robbie (our elf) as the star of the show. And I wanted to show you how you can do the same, making your kids SUPER happy for this holiday.

Here’s what you’ll need:
Red & White Christmas Wrapping Paper
4 Red Chargers
4 White Plastic Plates
4 Red & White Paper Plates
4 White Mugs
Silverware
Assorted Candy for Candy Bar Area
Christmas Garland
Peppermint Candy Canes
4 DIY Christmas Red & White Mason Jars
Plastic Candy Cane Assortments
Red & White Paper Cones
Mason Jars to hold Assorted Candy
Red & White Paper Straws
Welcome Candy Cane Lane Sign
Styrofoam Candy Canes
Red & White Table Size Mailbox
And don’t forget your Elf on the Shelf!

Directions:
Lay out a white tablecloth or plastic white or red tablecloth, and then roll out Red & White Christmas Wrapping Paper on top of it.
Next, lay the Green Christmas Garland in the center of the table. Depending on your vision for this table, you can make this look really fancy or very cartoony. It really depends on whether you’re gearing it toward children or mixed company. Go for a fuller and more realistic garland if you want it to look more grown up. You can even add pine cones from your back yard or Dollar Tree winter florals to fluff up a cheaper garland if you want an affordable option.
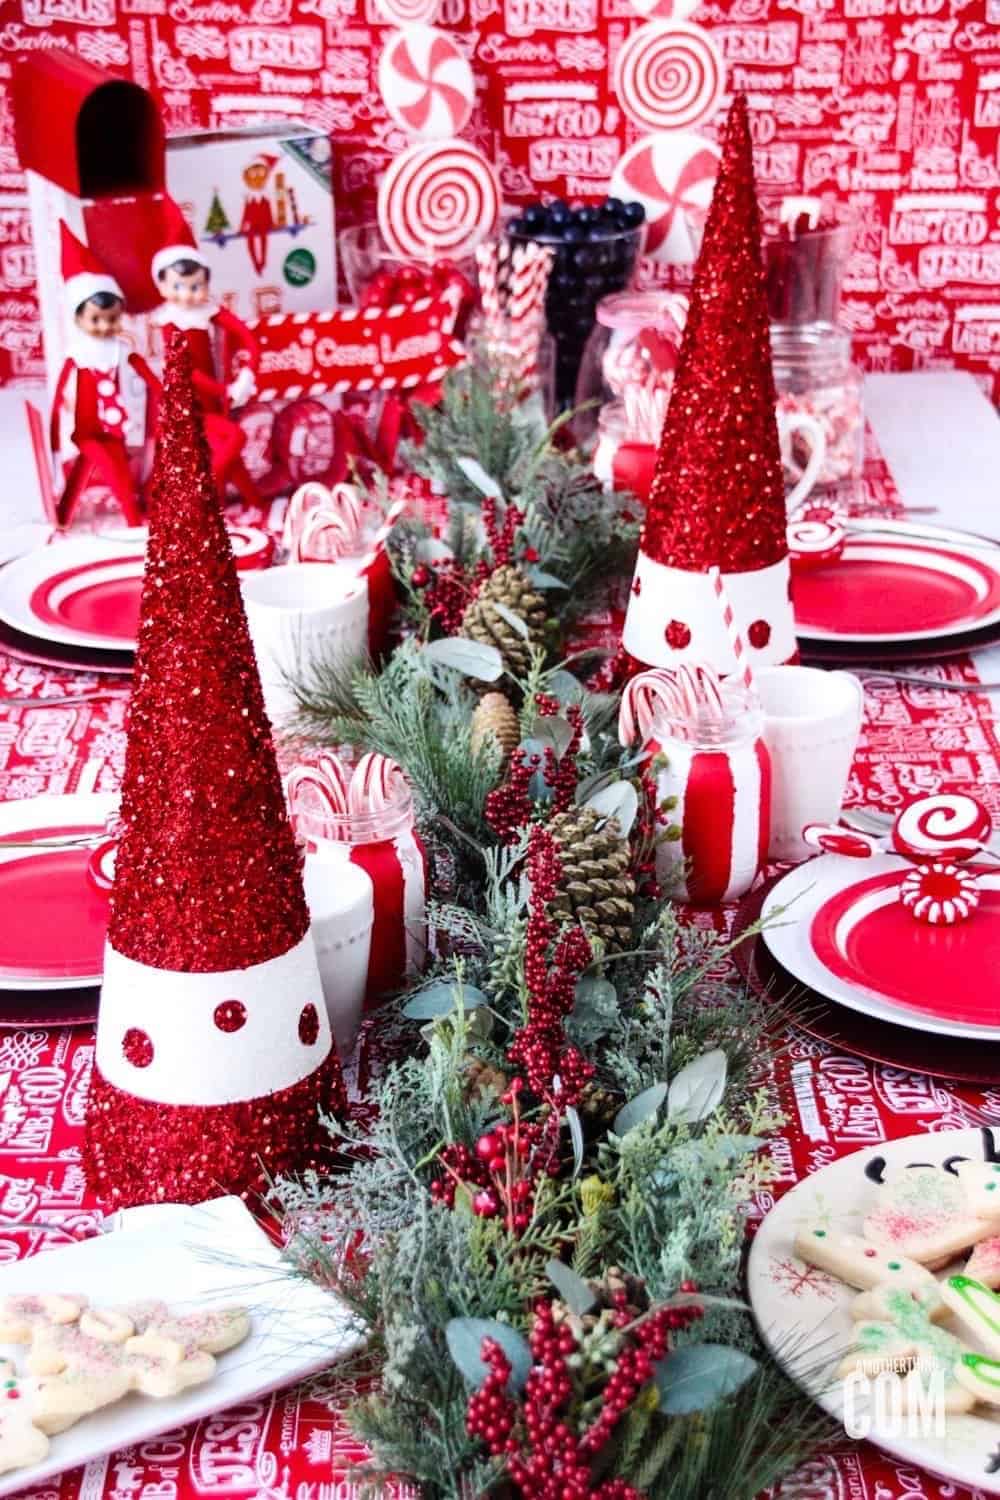
Set the table
Place Red Charger, followed by the white plastic plate. Then lay the red with a white trim paper plate on top. I added a red & white fake lollipop across each plate for an added festive look.
If you have the supplies, you can make fake lollipops yourself with a bit of polymer clay. Or again, if you want a more affordable option, Crayola makes a great air dry clay you can buy. Just create small disks of varying sizes and use some red and white paint to create different designs!


Place a white mug to the right of each table setting. Add your DIY Christmas Red & White Mason Jars. I put candy canes in each one.

Add Red & White Paper Cones on each side of the Christmas Garland. There are tons of options on the paper cones. You can keep it simple with basic paper, but I *might* have been a little extra and dipped mine in glue and glitter. I thought it added a little glitz, and I liked it a lot.
Update Dec 2021: 6 years later, and I wanted to make a little note that I no longer advocate the use of glitter in crafts. If I do need or want to use glitter, I HIGHLY encourage you to use eco-friendly biodegradable glitter, which is SO much better for the environment. Thank you to all of the readers who have educated me over the years about the danger of glitter.


Add silverware to each place setting. I love buying a big case of realistic looking plastic silverware, as it is really lovely but saves on dishes.
For the Candy Area, I added the Styrofoam Candy Canes and the Welcome to Candy Cane Lane Sign. I placed the assorted candy in Mason Jars, adding fun Red & White Christmas Decor, the Elf on the Shelf box, and of course, the Elf!
Also, you see those delicious sugar cookies? You can make them, too! Find my delicious recipe right here!

Cute, or nah? Cute, right!?

And that’s it! This is a great Elf on the Shelf Idea to welcome your Elf or have a special breakfast! It’s also great for the kid’s table at the actual Christmas dinner! The kids can have fun playing and enjoying the fun decorations while the adults stuff their faces and enjoy some conversation!
And if you like this, check out my Elf on the Shelf Magical Christmas Bundle with tons of printable ideas to make your Elf experience as EASY as possible this year and every year!
I hope you love it! Let me know if you give it a try! Don’t forget to pin for later!


Katie Reed is a passionate writer and mother of four vivacious boys from Salt Lake City, Utah. Drawing from her own journey through TTC, pregnancy, and the joys of raising children, she offers a wealth of insight into the world of motherhood. Beyond her heartfelt tales, Katie delights her readers with family-friendly recipes, engaging crafts, and a curated library of printables for both kids and adults. When she’s not penning her experiences, you’ll find her crafting memories with her husband and sons—Dexter, Daniel, Chester, and Wilder.


The wrapping paper and garland are so bright and fun! Though, I have to admit that I have a love/hate relationship with our elf!